

We had another crop at our local library on Saturday. Normally, I'm very skilled at packing for a crop so that I have everything I need to get lots of projects done. This time, I made one critical error: I forgot to bring any patterned paper!
In my defense, we had planned to do some mixed media play, and I might have been slightly over enthusiastic to use some of my new scrappy purchases. In any case, when I was done playing with paint and wanted to make a layout, I discovered my error. Knowing I had a project due for Simple Sketches, and I was unlikely to do any more scrapping after the crop, I decided to make due with what I had.
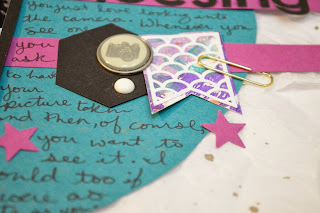
I loved the result so much that I challenged myself to do another one. Since all my things from the crop were still all together, I limited myself to them. Here's my finished layout

I love all of the fun layers. To make the background, I started with ordinary white crepe paper streamer, which I spritzed with my two favorite colors of spray mists. Once the crepe paper was dry, I laid them down in horizontal layers adhered with my ATG.

I've had a pack of Maya Road chipboard banner pieces in my stash for quite a while, but I haven't found a use for them yet. I covered them with art paper, and fussy cut around them, finishing the banner off with enamel dots, letter stickers, and embroidery floss.

All the rectangular layers were built up behind the photo before I decided where to embellish. I chose two clusters of embellishment, and used more art paper to stamp and cut the Echo Park Flower twice to use in each of the clusters. The other die cuts used in the clusters are extras cut with the Silhouette. Whenever I cut a shape with my silhouette, I like to fill up the paper because I don't like how the cutting mat causes the leftover paper to curl when you pull it up. I keep the extra cuts in little baggies that I go to whenever I need embellishments.

I hope you liked this project, and that it inspires you to try something a little outside your comfort zone. Check out the other post I have up today on the 3 Scrappy Boys blog using patterned papers from the April 2013 Add On Kit.
No comments:
Post a Comment